Sunday, March 11, 2012

Coal Stage

Last Saturday I decided to make a coal stage to go with the Engine Shed recently completed. The model was inspired by an example built by Stephen Williams for his "Faringdon" layout. The layout is discussed at length in a 3 volume Wild Swan set "Great Western Branchline Modlelling".

I used plastic sheet and strip. To simulate wood I scraped some coarse sandpaper over the plastic. An Olfa carpet cutter ("scrawker") works well to scribe planks.


Painting was a black/brown mix. Once dry I airbrushed first earth, then black. To finish I added a pile of coal and some tools.

It's very satisfying to do things like this. Sure there are kits, but this is unique and, best of all, cost next to nothing since I found most of the material in my scrap box.

John

Friday, March 2, 2012

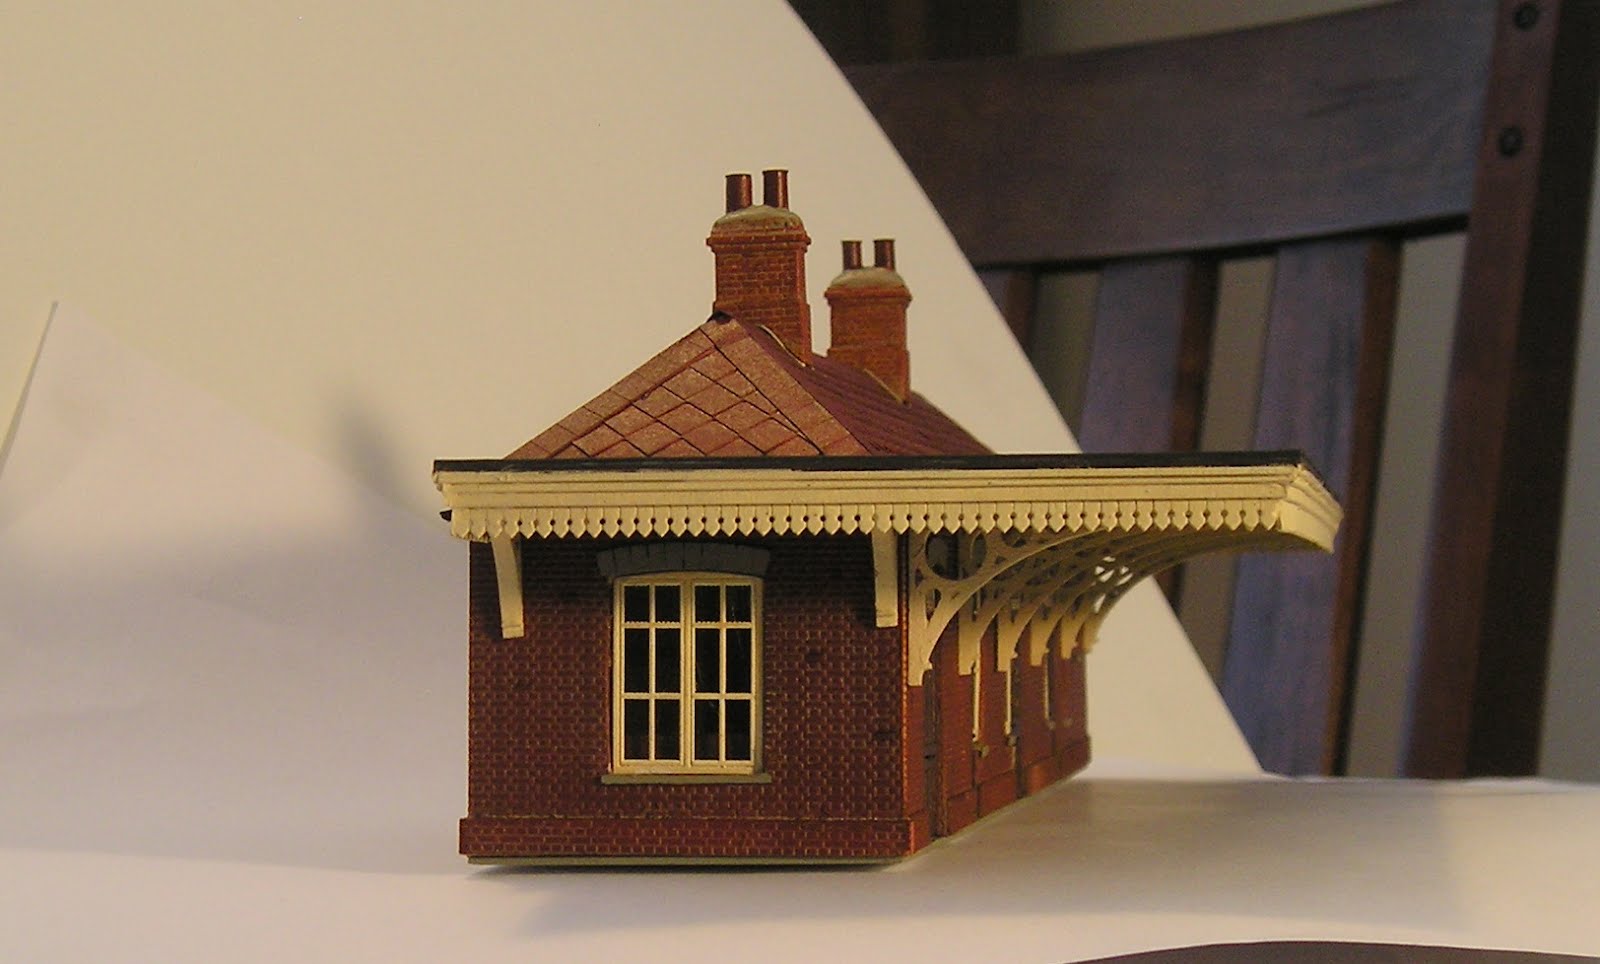
C&L Laser Cut Wood Kit of a GWR Station

Following on from the last post, I have completed the subject kit. Details can be found here: http://www.finescale.org.uk/index.php?option=com_virtuemart&Itemid=55.

You can also read a review in the July 2011 edition of British Railway Modelling, so I won't spend time going over general construction. The recommended glue is Aliphatic Resin (in it's basic form this is Lepages Yellow Carpenter's Glue). It comes in smallish bottles, similar to those used for cyano, but it seems to be unheard of here. I used cyano, contact cement, PVA and Yellow glue as the need presented itself.


Opening the box:

Wow! Loads of beautifully cut birchwood ply pieces. Windows and doors come in for particular praise. However, upon examination of the main walls I was dismayed to find that they are butt jointed and thus lose the brick detail at the ends. The same issue is evident with the chimneys. I had to sit and think for a few minutes. My decision was to reproduce the walls out of plastic card using the wooden pieces as templates. My philosophy is to make a decent model using the kit as an aid.

Making a start:

First order of business was to measure up and cut the walls to shape. Note: Door and window openings have to be cut 0.5mm wider on each side (I do this by eye). Offer up the windows and doors to make sure you are close to the right dimension. After that I glued on SE Finecast English Bond brick (Slaters works equally well). I then glued strips of brick down the edges of the doors and windows to try and give these an appearance of brick (hence the need to cut the apertures oversize).


Wall ends were bevelled 45 degrees(ish). When the strips mentioned above are dry, trim flush to the inner wall. Simply cut the window and door openings out now. Again offer up the doors and windows, slight sanding should get everything to fit. I added the lintels and sills at this point using cyano.

I spent quite a bit of time making a representation of the interior using floors and other details from Scalescenes Interior Elements kit: http://www.scalescenes.com/scratchbuilders-yard This is entirely optional.


Interior walls provided in the kit should be glued back to back.

The walls are glued together, made square and left to dry. Do ensure the walls are square otherwise the roof won't fit properly.

Painting:

Obviously painting is a crucial part of any kit. When I make a model, always in the back of my mind is...painting. The order of construction in many kits ignores the need to paint. I like to make subassemblies and paint these, avoiding hard to reach areas. You can go back later to touch up.

Walls: Before assembling together I start with a coat of red oxide car primer. Allow to dry then apply a thin wash of mortar colour (I used acrylic Concrete). After about an hour or so, get some ammonia based window cleaner and cotton swabs (applicable to acrylic paint). Dip the swabs in the cleaner and gently rub the walls to remove surface Concrete colour. The mortar course should remain concrete colour. Do this until you're happy. Don't rub too hard. Dry the walls and get your brick red colour. I simply added red to Tamiya Flat Brown. Dry brush the brick colour trying not to get it in the mortar courses. After this is dry, I lightly brushed some rust coloured powder on the walls. Finally, seal everything with matte varnish.

Windows: These are (in my mind) cream. I don't get all OCD about accurate colour and used PollyS D&RGW Cream. However, before applying the top colour, spray paint the windows (and doors) with flat white. This covers much better than brushed on white. When dry, the cream goes on very nicely.

Doors: These need to have the panels painted cream while the doors are chocolate brown (here I use Tamiya Flat Brown). Painted panels are a problem for me since no matter how hard I try, I can't seem to get a satisfactory result. In this case, however, I hit on a neat solution. The doors are thin enough that I was able to cut the panels out and paint the door. I then got a piece of pastic card and painted it cream, gluing it to the back of the door. Finally, I drilled a 0.020" hole, and bent some fine wire to make door handles.

Glazing: The supplied glazing will go straight on the backs of the doors and windows. It is covered with protective film. I cut mine to shape because of the interior. Best to follow the instructions here - I didn't.


Roof Trusses: These are explained in the BRM article. These fit very nicely. Lots of spare bits are supplied, some of which serve no obvious purpose (always worrying). I elected to stain the projecting rafters.

Canopy: Do a trial fit of this. If your main building isn't true, you will find out now. I used cyano to fix the ribs. The spacer tool is just a bit too wide since by the time I got to the end, my rib spacing was off quite a bit. I should have done some measuring. I sprayed the roof with grey car primer and then, when dry, painted it with PollyS Grimy Black.

Barge boards: These come on a "fret" with the layers. Again this is explained in the BRM article. Essentially start with the wider strips and glue these to the top of the bargeboard. Then, take the narrower strips and do the same.

Canopy assembly: Straightforward - glue the flat roof to the projecting rafters.

Main Roof: Four pieces of pre-cut plywood are supplied. These are cut slightly large so careful study and trimming is needed to get them to fit snugly. Finally sand the joints smooth.

Roof Tiles. Pre-cut paper tiles are provided. I used PVA in a jar with a small brush. Apply the PVA to the plywood and while the glue is wet, lay on a strip of the tiles. Let this dry for a few minutes. Proceed to the next strip orienting in accordance with the instructions. Don't rush. Finally apply the ridge tiles. Tip: make a small cut at each end of the ridge tile strip. Turn it over and, using the BACK of an exacto blade, score a line. This will make it easy to bend.

Main Roof Painting: I masked off the entire building. I used red oxide car primer on the roof. When dry, my brick colour was used.

Bargeboard Assembly: I had to think about this because the location of these is not obvious. A look at the photos on the site helped me to figure it out. Snip off about 4mm of each rafter, sand. The bargeboards are glued to the canopy flush with the edge of the canopy. Fitting needs to be done carefully. The corners need to be filed to a 45 deg. angle to make a crisp joint.

Chimneys: I assembled the wooden chimneys that were supplied but I was unhappy with them. I elected to make them using plastic card and brick. The cast chimney pots should be sanded to get rid of flash and mould lines.


Notice Boards: Some lovely boards are supplied but I couldn't see how I could paint them convincingly. I made my own from plastic card & strip. Text was done with Powerpoint.

Conclusion: The kit makes up into a stunning building as Nigel Burkin said in his article. I'm not convinced that it's a good idea to cut and etch brick walls from wood. The mortar course depth isn't deep enough and, as I mentioned, the end wall detail is lost. Far better to use plastic for this.

Edit 10 March 2012

I have now weathered the building and photos follow:


John Kendall

Friday, February 24, 2012

Mikes Models GWR Yard and Water Cranes

For our branchline, I recently bought some of the subject kits. These can be obtained from Holt Models (http://www.holtmodelrailways.com/search.php?search=mikes). I thought I'd try to provide some insight in the construction of these since I think most of us are used to building plastic kits.

General:
The kits are primarily in cast white metal. The first thing to do when dealing with white metal is to wash the parts with soap and water. I happened to use Windex (window cleaner). Once dry examine the parts and remove flash by sanding or scraping the edge of a modelling knife along the seam. Look at all the holes where parts will have to pass through. Dry fit and use a reamer to to open the diameters until you get a snug fit. Its a good idea to give the mating surfaces a rub with a fiberglass pen

There is some brass chain in the kits. I used Carrs chemical blackening fluid to darken these. Painting tends to clog the links.

Yard Crane (MM37):

Try to work out where everything goes before assembly. For this kit, it is certainly not obvious. Even the photo in the link seems to me to be incorrect. Once I got everything sorted assembly was fairly straightforward. I used medium viscosity cyano adhesive. The only issue I had was getting the crane to swivel. It took a few minutes of sanding the spindle before the crane swung freely.


Note the position of the small gear wheel and brake. It took me a bit of thought to decide to put these where you see them. I couldn't find a picture of this specific crane. My logic said that the operator would want to have the crank and brake close together so, in my configuration the crank can be turned by the right hand and brake operated with the left - this seems right.

I made a plastic card base painted with aged concrete.

Painting:
I always like to prime my models and when dealing with metals, I believe this to be most important. I use car primer, grey for the crane. When dry, having no idea of the prototype colour, I used grimy black for the frame and gunmetal for the gearwheels. Once that was dry I weathered the model. Everyone has their own method but mine is fairly simple - I simply airbrushed a light coat of earth followed by a light coat of black. I then drybrushed some rusty powder here and there.


Water Crane, Platform (MM6) & Floor Mounted (MM161):
These are very straightforward and assembly is pretty obvious. On examination, my first thought was that the guy wire supports (cast in white metal) are too fragile (in fact, if memory serves, at least one had already broken off). I decided to replace the guy wire supports with 0.032" brass wire. I snipped off the supports, sanded smooth and drilled. It's a good idea for things like this to start with a small hole and work up. You have a better chance of centering the hole. I began with a 0.020" drill (dip the drill in oil, this will improve the cutting and prevent jamming) and when deep enough switched to a 0.032" bit. Wire was glued in and cut to length. I also drilled 0.020" for the guy wire at the other end of the crane. Finally I replaced the cast hook on the drain with a wire version. I also decided to replace the chain attachment with 0.020" wire. Again medium viscosity cyano is the adhesive.


I constructed a two piece base in plastic card and strip. I wanted to be able to plant the cranes in a layout mounted base for exhibition.

Painting:
Again, primed with grey. After that, since the top coat is very light, I sprayed again with Testors Flat White. THis time I was able to find a couple of pictures of GWR water cranes. I used D&RGW Cream for the body colour (I never seem to have the actual railway colours) and Humbrol Matt Sand. I picked out details in black. Weathered with earth and black and brushed with a light dusting of black and rust powder here and there.

Conclusion:
I am very pleased with how these turned out. A modicum of care (as with all kits) will result in an excellent result. Remember that we should be building a model of something using the kit as an aid. Building a kit is something else again. I am never shy to discard parts I don't like or change something.

Saturday, February 11, 2012

Engine Shed for the Branchline

We are constructing a branchline for Allingham based on GWR/Western Region. The line ends up at a terminus station serving a small town. We decided to construct this section of the layout to fine scale (code 75 rail, hand built points) vs the code 100 railof the main layout.

I put my hand up to build the engine shed and we decided upon a small affair based on that at Tetbury. Fortunately we had a book to hand that provided photographs and line drawings of the shed to 4mm scale.

The finsihed product is shown here:


Construction is 0.040" Evergreen plastic sheet overlaid with Slaters English Bond brick. Various plastic strip was used for detailing.

Tuesday, November 29, 2011

Chivers LMS 6 Wheel Fish Van

by John Kendall

My friend bought this kit several weeks ago. First impression was the kit is very finely moulded, but I had to do a double take upon seeing a pair of plastic dummy wheels with flats. These were intended for the center axle and my reaction was "not on your life". In retrospect, I think Chivers should be credited with providing a method whereby even the greenest novice can produce a working vehicle. Issues with 6wheels are well known and the Dapol Stove R has certainly come in for it's share of stick (see my post about how I fixed mine).
My approach to the underframe (which is my brief, my friend will complete the van) was to use the following:

Bill Bedford spung W irons available from Eileen's Emporium

http://www.eileensemporium.com/index.php?page=shop.product_details&flypage=eny_fly_default.tpl&product_id=5879&category_id=288&option=com_virtuemart&Itemid=9

Bachmann 14mm plain coach wheels

Crank from a wagon brake fret

The outer axles were fixed and the center axle allowed to slide laterally.

A note on brake yokes. The W iron fret contains these and I did try to fit them. I found though, that the 00 back to back meant that the yoke fouled the wheel rim.

Here are pictures of the finished underframe:


A slight problem was encountered with the center axle being constrained by a safety loop. This was corrected by tweaking one slightly.

Revision 11 Dec 2011

The van is complete and I took it round to the club last night. I am delighted to report that it performed superbly. I had it going back and forth through pointwork, even slips and it never faltered.

Here's a picture of the finished article:


20 March 2012

The picture above shows the van in a slightly drunken posture, which I only noticed after the article was published. I found later that paint had fouled the spring mechanism. After cleaning, the van rides properly.

Monday, October 17, 2011

Progress at Allingham - Backscenes

We exhibited our 00 layout Allingham at Ottawa Railfair this past weekend.  The new backscenes were debuted:


The backscenes are, of course, from the Townscenes range.  I have long been an admirer of these and this is not the first time I have used them.  We dithered for a long time on a decision for backscenes but I am not aware of a better product for the urban scene we have here.

I wanted to do something special.  Users of Townscenes will be aware of the recommendation to mount buildings on card to give a 3D effect.  I mounted my buildings on foam core using brick paper to wrap the sides.  Here's a useful site for brickpaper:

http://paperbrick.co.uk/index.php?action=selectbrick

I also used 2mm card in some cases to give the roof a pitch.

I fabricated chimneys by wrapping paper around 1/4" balsa or birchwood.  Chimney top is a bit of card and chimney pots are from various sources including Wills, Dart Castings and Plastic tube.

Shortly after the show opened, there was a run on Townscenes at British Connection - the proprietors were very happy with us. 

You may note the fine looking signals.  These were built by one of our members and painted by another - still a bit more work to do.  These incorporate solenoids for actuation and plug into the board for transport.  In the next while a control panel will be wired up so that the next time we exhibit (GBTS in Brampton ON in April 2012), the signals will operate.  We had a demo the other week and I was pleased to see that the arms do bounce.

Cheers

John

Sunday, September 18, 2011

Preliminary work on the back scenes for the clubs' exhibition layout, Allingham, has been started by club-member John Kendall...well done John!